Making a Mini Greenhouse, to Extend Your Growing Season
Author: Kirsten Bradley
Go to Source
No matter if you’re gardening on a tiny patio or an acre or two, there is a mini-greenhouse design that is right for you! Greenhouses are a great way to extend your growing season, AND build your household resilience at the same time.
By extending your growing season with a greenhouse, you can literally warp time in your garden. Greenhouses can give you an extra month or two in Spring to get things started (come on, tomatoes!) and even extra time in the autumn, to ripen things up…
Greenhouse designs come in all shapes and sizes, from huge, beautiful glasshouse constructions (sometimes using upcycled windows) down to the simplest DIY solutions possible – a simple windowsill, or a pane of glass propped against a wall.
Whichever type works for your context, designing a mini greenhouse (or heck, a full greenhouse, if you have enough room) into your growing space is an excellent way to become more self-sufficient in strong spring seedlings, as well as lessening the impacts of weather shocks in your garden.
And if you get really keen, a greenhouse can even be used to warm your living space. Stacking functions and lowering heating costs while you raise the next crop? Yes please.
A note before we begin looking through your different options. The basic premise of a greenhouse is an enclosed space where solar energy comes in – through either glass or plastic – and is captured, heating the space. But airflow is key. I’ll just say that again… airflow is essential.
Because without airflow, your greenhouse quickly becomes an oven. Which is the opposite of what plants need to thrive. So – no matter what kind of greenhouse you end up making, just remember – it will always be a balance between heat/light, and airflow.
Having fried many a seedling in our early greenhouse experiences, I thought you might appreciate the airflow factor being made very clear from the start. Ok, let’s see what design is right for you – so many options!
This article is also part of our Permaculture Living 2020 series – one do-able idea, strategy or habit for you, each week, to build your household resilience – while also engaging in everyday climate action. Make sure you’re subscribed to our newsletter to get all the goodness, straight to your inbox, each week.
Starting small (and dirty)
If you’re growing in a small space (or no space), or maybe starting from scratch here, there are still lots of options for you when it comes to extending your growing season.
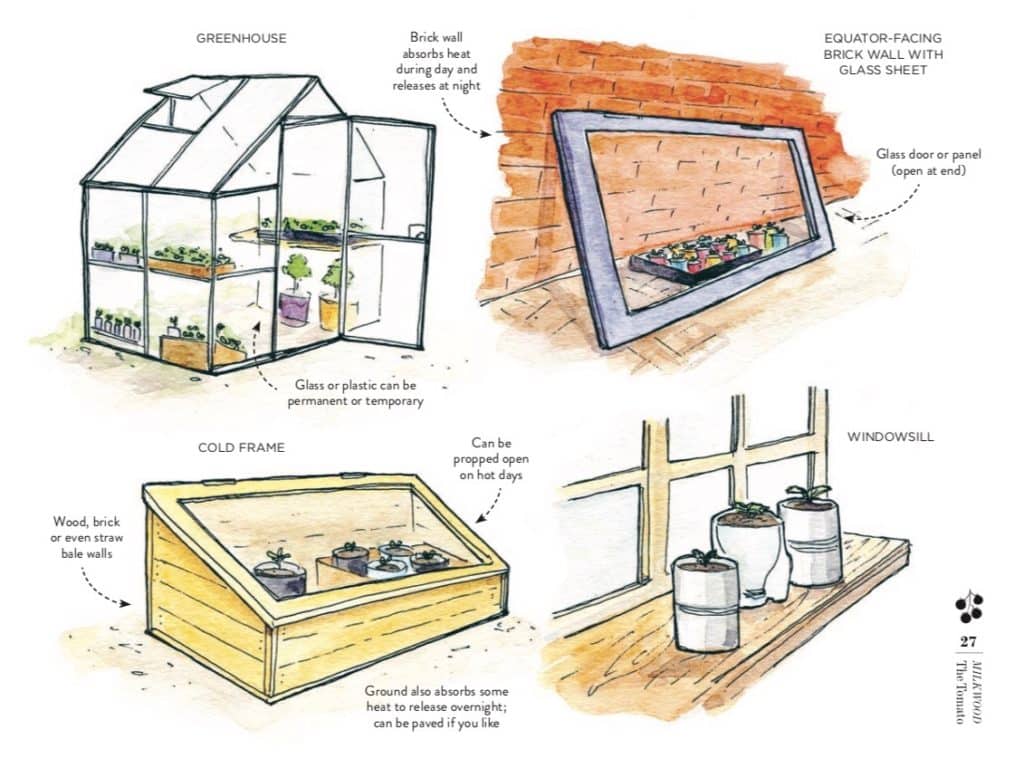
Equator-facing brick wall
If you have a brick wall that faces the equator and gets some sun during the day, this is a great place to start.
A simple pane of glass propped against a wall (maybe an old window or glass door, if you can find one) will help shelter seedlings from weather and frosts, while increasing solar gain, and therefore the seedling’s soil temperature.
The humble windowsill
Got a sunny windowsill? You are in business, my friend. Welcome to your first mini greenhouse. Seedlings placed here and watered well will thrive.
Fishtanks & Plastic Tubs
Don’t forget about the humble fishtank, nor the plastic tub. Both make excellent seed raising environments by acting as mini greenhouses – by adding just a bit of heat, without must setup at all. You can put a clear lid partially on them by day (ensure good airflow still) and a cover on them at night.
Another option if you’re using plastic tubs is to bring them inside at night, and put them outside each morning. Yes it’s basic, and yes, it works well to get seedlings started early.
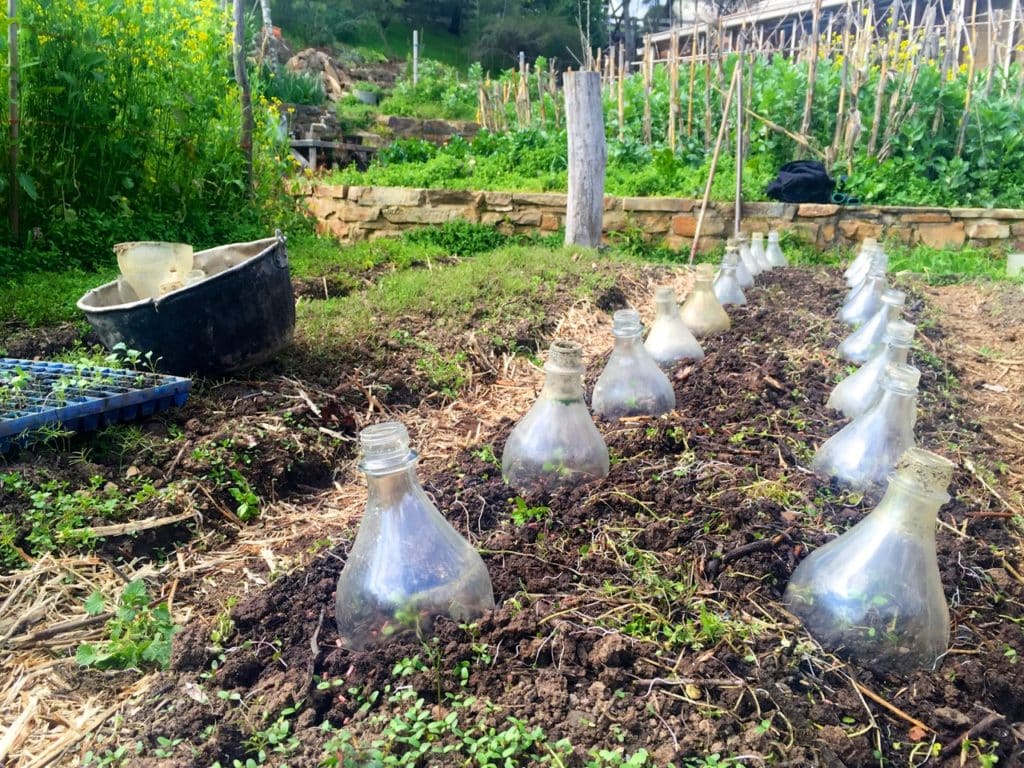
Cloches
One more idea is glass or plastic cloches – individual greenhouses for in-ground seedlings. These might be recycled glass flagons or they might be plastic yogurt tubs, or milk cartons.
Scaling up a little
If you have a bit more space, or are keen to soup up your season extension, there’s lots of options to get you growing
Cold frames
Cold frames are one step up from a plastic tub, but they can be permanently sited in your garden, or set up on a frame to move around.
A cold frame is a frame of wood with a hinged glass lid. The hinged lid can be propped open on sunny days, and closed on cold ones. The great thing about cold frames is that they can be used in-place in your garden, so your plants can continue to grow once they no longer need the frame.
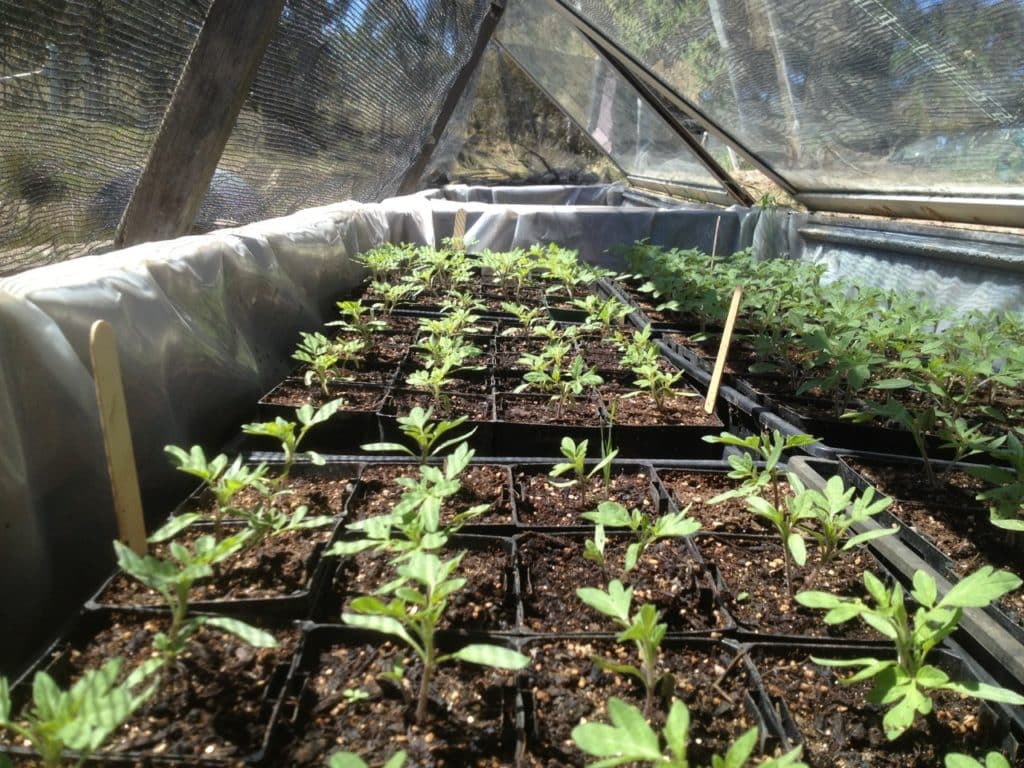
Or, you can set up cold frames in your seed-raising space and just use them for seedlings. Or, in some climates you can use cold-frames as a permanent garden growing space, treating them like a long, low greenhouse, like our friends Hannah + Anton do in Hobart Tasmania.
Mini greenhouses
And then there’s the world of mini-greenhouses. You can make your own out of windows and scrap wood, or garden centres have every design from plastic over a frame with zippered door to the full greenhouse experience.
Greenhouse-level gorgeousness
If you have enough space and you want to extend your growing season, there are SO many DIY + off-the-shelf options here. There’s definitely one right for you…
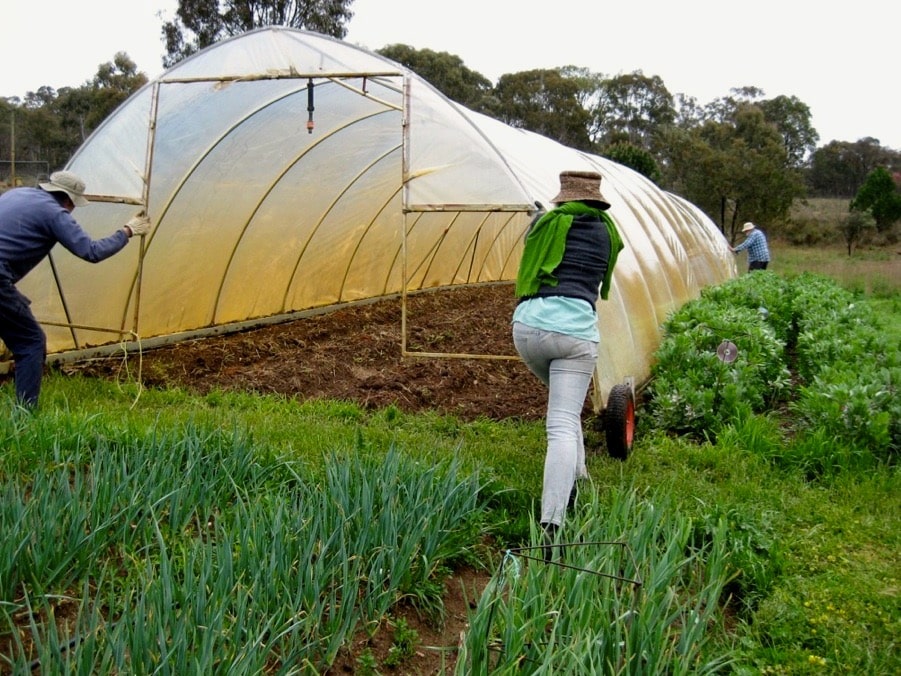
Polytunnels
If you have a lot of growing space, a polytunnel might suit? These can be extremely DIY affairs, or you can buy full frames and hardy plastic ‘skins’ from greenhouse suppliers.
Ages ago at our family’s farm, we set up a polytunnel using the middle road – a DIY frame (polypipe + star pickets + wood) and a greenhouse ‘skin’ – a UV stabilized plastic greenhouse cover, which lasts a decade or so. We found it a great balance of cost and function.
Polytunnels are great for seed raising and also function as pleasant garden work-spaces over the winter months. You can also install permanent beds in your polytunnel and grow your veg in there. Just be careful about crop rotation, to take care of your soil.
The other cool thing you can do with polytunnels is move them, if you set your system up right. Sliding a polytunnel on skids between two garden beds, on a two year rotation, means you can revive your soil in it’s ‘off year’. This design is not for every garden, but an excellent idea for some.
Glasshouses
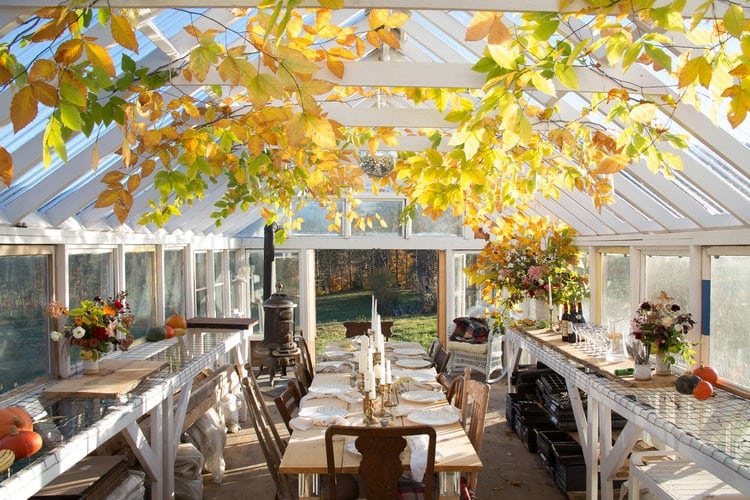
Glasshouses can be spaces of both beauty and function – seedlings and seed raising, and permanent plantings, too. Again, they come in all shapes and sized, DIY and off-the-shelf. Some people attached a glasshouse to their main houses as a ‘garden room’ which also helps heat the house. For others, it’s a little thing down the bottom of the garden.
My fave DIY glasshouse crush is the one at Stitchdown Farm in Vermont – upcycled windows for walls, and laserlite (clear plastic) roof for strength, hail protection, and definitely no leaks. An excellent combo of upcycling and dependability. Maybe one day.
Also, don’t search DIY glasshouse on Pintrest unless you want to lose the next few hours of your life. Suffice to say, there are a lot of great examples out there. And there’s definitley one that you can make with your current skills. Resources below.
Off-the-shelf greenhouses and glasshouses
Not up for the DIY? There are many (so many) off-the-shelf greenhouse and glasshouse options out there, in all shapes and sizes – from super small to magnificent. Always make sure the one that you chose has excellent airflow options.
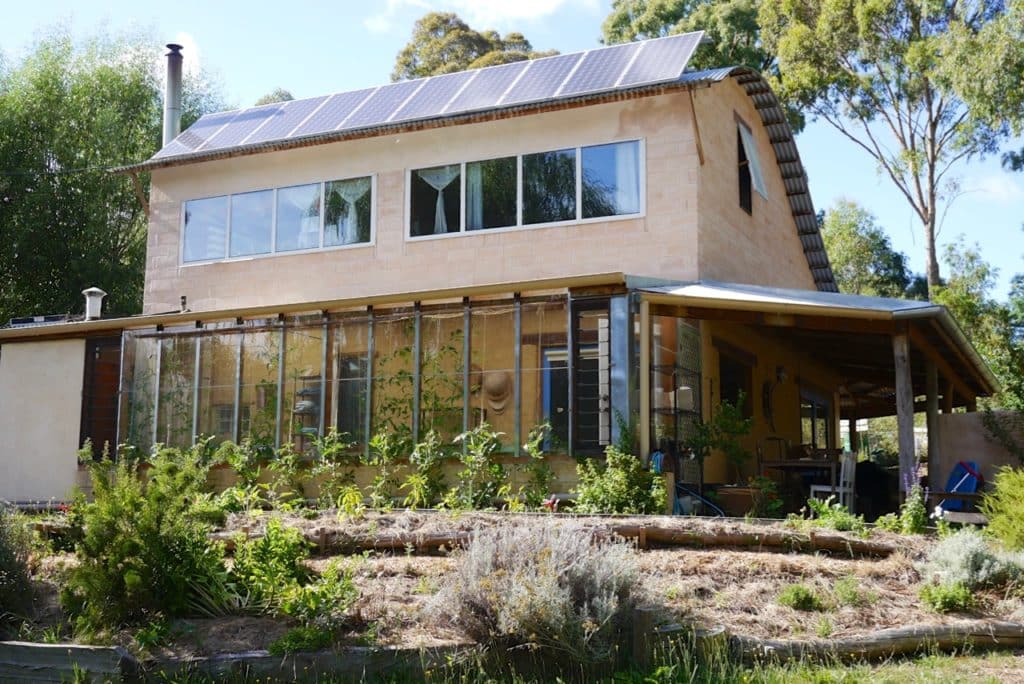
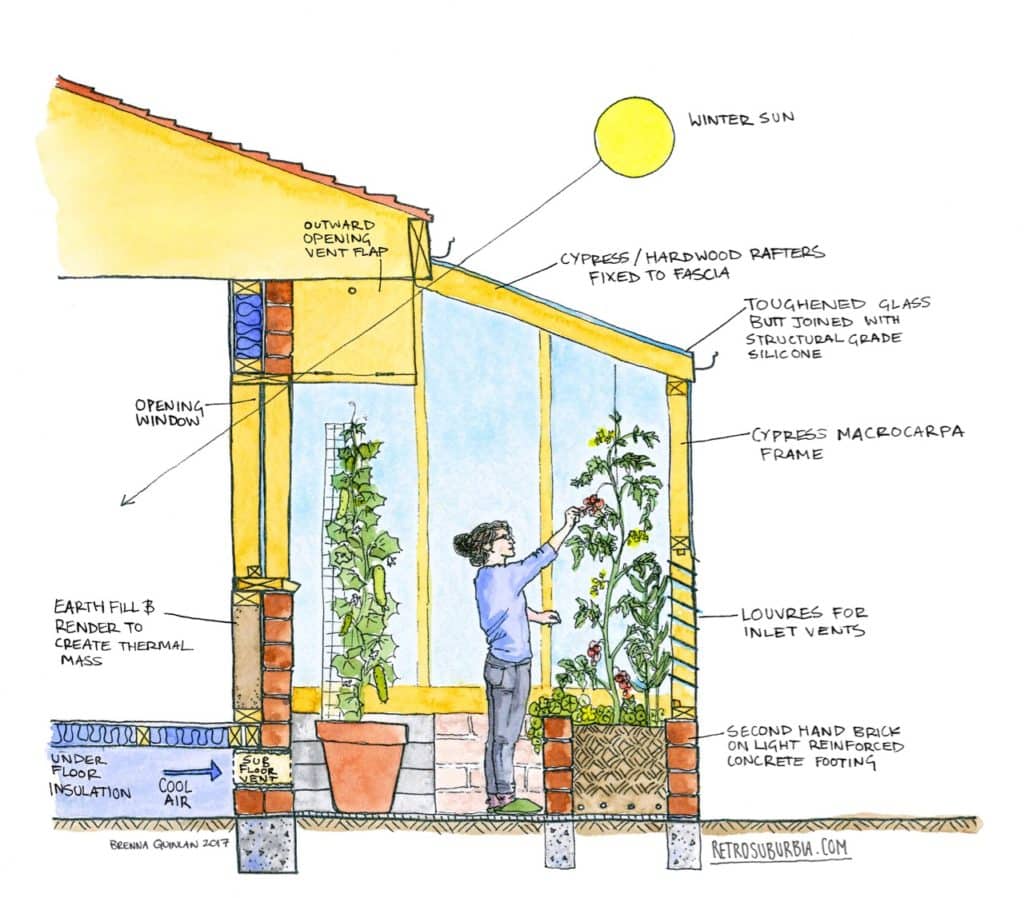
Passive solar greenhouse
And then there’s the passive solar greenhouse option – a glasshouse attached to a house (on the equator side) to both provide growing space AND warm the house with solar gain. This might be as simple as adding a small extension in the form of a glassed-in nook to an equator facing window at your place.
Suitable for temperate and cool-temperate climates, a solar greenhouse can be a very beautiful thing – we lived in the studio at Melliodora which had one of these for three years, and it was our main house heating by day, in cold winters (on sunny days, that is!)
There are a lot of considerations to this kind of design – thermal mass is key – so if you’re keen, we’ve added some resources below for you to dive deeper into this design idea.
Curious to learn more? Join our live Q&A this Friday
This Friday we’ll be doing a Live Q&A + discussion on Mini greenhouses, over on our Facebook Page! This week’s Q&A will be held live at 3pm (AEST) on Friday 8th May. Join us if you can? Join the facebook event to ensure you get a reminder, if you like.
And if you have a question that you need some help with rgearding min greenhouses (or season extension in general), ask it as a comment below! That way, we can make sure that we answer you on Friday.
We’ll add the live Q&A video to this article after it happens, so if you miss the live version, no worries – you can still get the answer you were needing by watching it later. You’re welcome.
RESOURCES
Cloches + small stuff
Cold frames
- Making cold frames from glass doors – Milkwood
- In-bed permanent cold frames in Hobart Tas – Goodlife Permaculture
- Cold frame types + construction
Mini greenhouses
- 21 DIY mini greenhouse techniques
- All the small DIY greenhouse designs you can eat, on Pintrest – (beware, wormhole ahead)
Polytunnels
- Our DIY polytunnel that we built that one time
- Movable polytunnel tech at Allsun Farm
- Eliot Coleman’s movable greenhouse (he pioneered this idea)
- Eliot Coleman explaining his movable greenhouse tech
- Eliot Coleman movable polytunnel DIY pdf – Johnnys Seeds
- Four Season Harvest: Organic Vegetables from Your Home Garden All Year Long, Eliot Coleman (Chelsea Green, 1999) – methods like cold frames and tunnel greenhouses to keep gardening all year round – Booktopia / Amazon
Glasshouses
- 13 free DIY greenhouse plans
- Stitchdown Farm’s DIY greenhouse (scroll down)
Solar passive greenhouse
- The passive solar greenhouses at Melliodora
- RetroSuburbia, David Holmgren’s latest book, goes through the options and benefits of solar passive greenhouses (lots of examples on their website too)
- A solar greenhouse on an Earthship design in Australia
- Earthships in general tend to utilize solar passive greenhouses (depending on climate)
- The Forest Garden Greenhouse, Jerome Osentowski (Chelsea Green, 2015) – bring a forest garden indoors using near net-zero technology – Booktopia / Amazon
The post Making a Mini Greenhouse, to Extend Your Growing Season appeared first on Milkwood: permaculture courses, skills + stories.